The article information
- Li-Hong Dong• Bin-Shi Xu• Nan Xue•Hui-Peng Wang• Hao-Yu Li
- Development of remaining life prediction of crankshaft remanufacturing core
- Advances in Manufacturing, 2013, 1(1): 91-96
- http://dx.doi.org/10.1007/s40436-013-0004-7
-
Article history
- Received: 2012-09-12
- Accepted: 2012-11-05
- Published online: 2013-03-14
Crankshaft is the key component of engine,which can transform the driving force of cylinder to spin power. In service conditions,crankshaft is subject to complex stresses, including gas pressure,reciprocal inertia force,centrifugal inertia force,and external force moment [1, 2, 3]. Due to rigorous operating conditions,the fabrication processes of crankshaft are complicated and its price is very high. Some crankshafts out of commission still have high remaining value. If these crankshafts were remanufactured,their surplus value can be fully utilized [4, 5]. Accordingly,crankshaft remanufacturing is the focus of remanufacturing businesses. Since various damages may occur in old crankshafts during service life,their damage degree and remaining life must be evaluated before remanufacturing to ensure remanufacturing quality. The old crankshafts cannot enter into remanufacturing production unless they have adequate remaining life [6]. The old crankshafts had the features such as uncertainty of service history,complicacy of damage types,randomicity and individual otherness. Thus it is very difficult to exactly evaluate their damage degree [7]. At present,remanufacturing enterprises only use magnetic powder inspection to detect crack on the surface of crank pin. The crankshafts having crack cannot be remanufactured,whereas the crankshafts without crack can be remanufactured.
However,even if crack was not found in some old crankshafts by means of magnetic powder inspection,early damage still probably existed on the dangerous position of crankshaft. The remanufacturing values of these old crankshafts without crack are different. If early damage cannot be assessed well,the service reliability of remanufacturing crankshafts will be unwarranted. There are no holistic technology researches on how to predict the remaining life of remanufacturing crankshaft core. The above mentioned factors can lead to a hidden trouble of remanufacturing crankshaft. This paper introduced the works of Science and Technology on Remanufacturing Laboratory on crankshaft remanufacturing. Based on the results of finite element analysis,the Rangle zone of crankshaft was determined as a major measuring position. A special measuring probe was developed,and bending fatigue bench tests were carried out to collect electromagnetic damage information during fatigue process. A neural network model was established to identify damage degree of crankshaft core,and a damage evaluation equipment for crankshaft core was developed. 2 Finite element analysis of one throw of crankshaft
The research on remaining life prediction of crankshaft remanufacturing core must rely on advanced non-destructive testing technologies to diagnose the damage degree of old crankshafts. Therefore,the weak position,i.e.,potential dangerous position of crankshaft should be determined firstly. As is known,the most dangerous failure of crankshaft is bending fatigue fracture. Then,a finite element model of one throw was established to analyze the complicated stress state of crankshaft.
The fourth throw of WD615.68 crankshaft which is easy to suffer fatigue failure was selected to establish noumenal model,and then the model was led into a ANSYS software, which is a famous finite element analysis software,to divide freedom lattice. Figure 1a is the three-dimensional lattice model of the fourth throw of crankshaft.
 |
| Fig. 1 Finite element simulation analysis |
When a plunge is moved down to the bottom dead point in a cylinder during engine operation,crankshaft will be subjected to a maximum break-out pressure of cylinder,at this time,single throw of crankshaft also stands a maximum load. According to the load and constraint state at that moment condition,a terminal condition was applied to the throw. The restriction was directly applied to main journal of crankshaft to simplify calculation [8, 9],which assumed the right hand of the throw had a rigid fixing and left hand of the throw hinged fixing. Figure 1b gives the maximum main stress distribution nephogram of the fourth throw under the effect of break-out pressure. According to the results of finite element analog simulation,the stress amplitude is the maximum at the position of bottom dead position of knuckleRangle at which the probability of fatigue failure is the maximum. The position is determined as the weakest position of crankshaft. 3 Experiments on crankshaft damage diagnose by eddy current/metal magnetic memory testing
Based on the results of finite element analysis,Rangle zone was determined as the main measuring zone. The research of damage diagnose of crankshaft was conducted along the steps as follows:
(i) Is there early damage existing on the position of Rangle zone?
(ii) Is the early damage degree serious?
(iii) Is there a crack occurring on the Rangle zone?
(iv) What is the depth of crack?
(v) What is the evaluation of crankshaft remanufacturing adaptability?
The first and second steps were carried out by means of metal magnetic memory testing method. Metal magnetic memory testing can find out the stress concentration zone of ferromagnetic materials [10, 11, 12, 13]. It utilizes the weak self-leakage magnetic signals to detect the dangerous position of ferromagnetic material,which has a powerful potential in the field of early damage diagnose.
The third and fourth steps were carried out by means of multi-frequency eddy current testing method [14]. Eddy current testing can detect flaws on the surface or near surface of conductive materials. Multi-frequency eddy current testing is new development of eddy current testing, which uses several frequencies to excite induction coil at the same time. The vector operation of measuring signals was calculated to suppress disturbance and increase signalto-noise performance in the measuring environment. The multi-frequency eddy current testing can give attention to measuring sensitivity and effective depth. 3.1 Measuring probe design
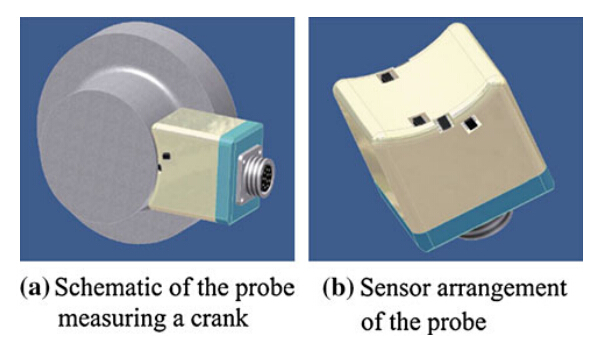
The geometry of crankshaft is very complicated,and its measuring space is narrow due to the influence of rod journal span and sector dimension. The general pen probe is difficult to enter into theRangle zone and its lift-off value cannot ensure unchanged during measuring process,which disturbed the collecting signals continuity and signals diagnosis accuracy. Then,a special eddy current/magnetic memory copying probe is designed,as shown in Fig. 2.
 |
| Fig. 2 Eddy current/magnetic memory special profile probe |
The probe has a cambered measuring face whose width and radius of curvature are same with the measured rod journal. Thus the copying probe can fully fit the surface of rod journal during measuring process. There are six channel probes on the measuring face. Three channel probes exist on each end of rod journal to cover Rangle zone completely. The design can restrain the disturbance of liftoff effect effectively. 3.2 Electro-magnetic damage signals analysis
In order to investigate the method of early damage evaluation of old crankshaft,metal magnetic memory signals on theRangle zone of old and new crankshafts were collected to obtain their distribution. Additionally,bending fatigue bench tests of crankshaft were performed,and the variations of magnetic signals were explored with damage increasing during fatigue test. 3.2.1 Magnetic memory signals distribution of new and old crankshafts
Fifteen crankshafts were chosen as test sample in China Heavy Automobile Restrengthen Power Corporation, including 5 new crankshafts and 10 old crankshafts. A crankshaft has 6 rod journals,each rod journal has two Rangle zones,then 12 magnetic curves can be collected from each crankshaft. Figure 3 shows typical magnetic signal curves from 3 crankshafts.
 |
| Fig. 3 Magnetic signals from different crankshafts |
The magnetic signal curves of new crankshaft presented ‘‘W’’ shape,and 12 magnetic curves had the same regular pattern except slightly different signal amplitudes,which reflected the influence from the manufacturing processes. The new crankshafts in a same batch have the same material and technical process,thus the distributions of magnetic signals were identical. However,the old crankshafts had different recovery channels,service conditions and discarding reasons. The magnetic signals of these old crankshafts reflected the influence of accumulative damage,which were disordered in contrast to new ones. Although the signal curves of old crankshafts with nice surface state still present ‘‘W’’ shape to some extent,their signal amplitude differences were increasing evidently. The signals from serious wear surface of old crankshafts were random without regularity.
The results showed that there are apparent difference of magnetic memory signals between old crankshafts and new crankshafts,and metal magnetic memory signals can reflect the influence of service condition of crankshaft. 3.2.2 Variations of electro-magnetic signals of crankshafts during fatigue test 3.2.2.1 Measurement of metal magnetic memory signals of crankshafts
There are great differences among the recovery old crankshafts including nice surface of rod journals,slight wear,and bad wear,even burning surface of rod journals. The parameters characterizing the damage degree of old crankshaft must be extracted and assessment criterion must be established to choose the old crankshafts with remanufacturing ability. Consequently,the samples of bending fatigue test were selected from some old crankshafts with different damage. During the fatigue test the fatigue machine stopped according to predetermined fatigue cycles, and then magnetic memory signals ofRangle were collected on-line,which were deeply treated by means of signal processing technology.
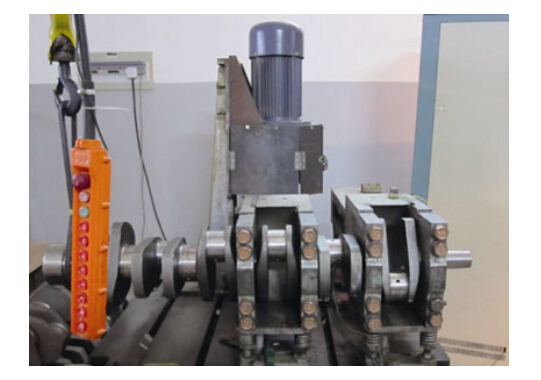
Crankshaft fatigue test machine was a CBFT-II resonance bending fatigue test machine in the horizontal position (see Fig. 4).
 |
| Fig. 4 Photo of resonance bending fatigue test machine for crankshaft |
The results showed that some old crankshafts still had a quite resisting fatigue failure power,which had passed 107 fatigue cycles under the condition of 1.8 times and even 2 times higher than a designed flexural moment. It is feasible to choose the old crankshafts with adequate remaining life to remanufacture.
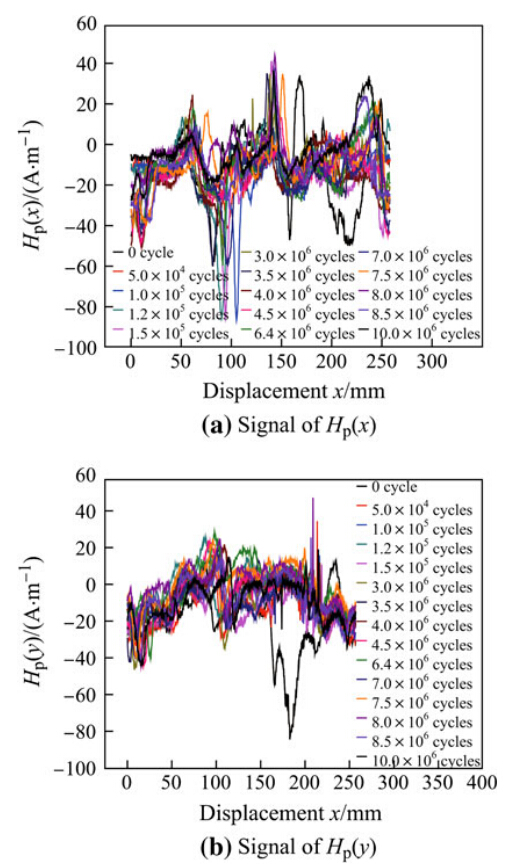
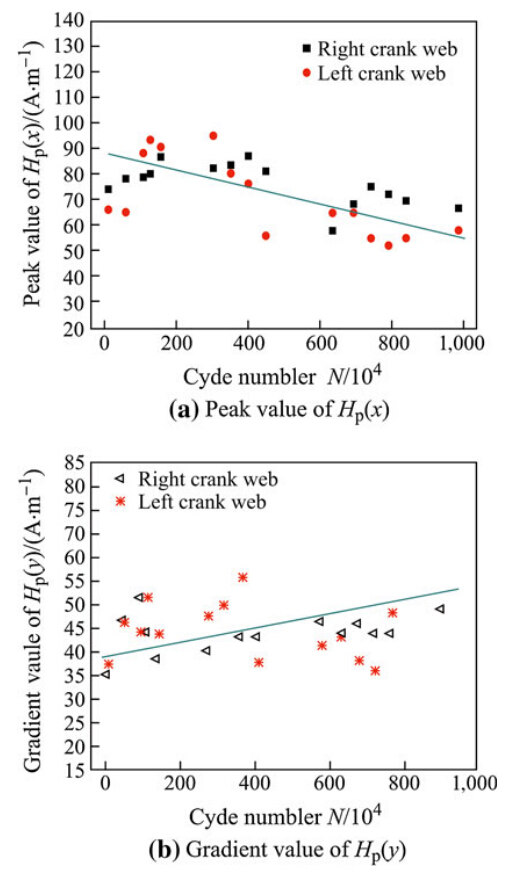
Figure 5 gave the variations of magnetic signals of a crankshaft passing 107 fatigue cycles without initiating crack during fatigue test. The tested crank was subjected to a bend moment 5,611.04 Nm. Figure 5a and b presented the normal component HP(y) and tangential component HP(x),respectively. Two characteristic parameters,magnetic signal gradient value Kof HP(y) and the peak value of HP(y),were extracted to draw a relational graph with fatigue cycles increasing (see Fig. 6).
 |
| Fig. 5 Magnetic memory signals collected during fatigue process |
 |
| Fig. 6 Variations of characteristic parameters of magnetic memory signals |
The bend moments acted as an externalexcitation magnetic field when they were applied to the tested crank. The distributions of magnetic signals onRangle zone showed some regularity,which varied slightly with fatigue cycles increasing. The peak value of HP(x) showed a drop tendency while the gradient K value of HP(y) showed an upward tendency.
In fact,magnetic memory signals varied nonlinearly,which is difficult to be described by mathematic model. A single characteristic parameter of magnetic signal can hardly characterize the damage degree of old crankshaft. Hence,our research group utilized neural network technology to identify damage intelligently [15]. The 3 layers BP neural network was established,which structure was 59891. Levenberg- Marquadt reversal algorithm was adopted. 5 typical characteristic parameters of magnetic memory signals were chosen as input vectors and the damage degree of tested sample was the only nerve unit determined as output layer of neural network. The maximum relative error of the network modelwas 5.10 %. 3.2.2.2 Crack quantitative measurement by multi- frequency eddy current testing
The results of crankshaft bench test showed that the depth of fatigue crack determined residual fatigue strength after fatigue crack occurring directly. Shallow surface crack had little influence on remaining life of old crankshaft. However,it is difficult to measure the depth ofRangle crack by X-ray inspection and ultrasonic phased array inspection technologies. Multifrequency eddy current testing was determined after repeated testing.
Some standard crank specimens with different precut depth of cracks were made firstly,and multi-frequency eddy current probe was used to measured the precut cracks,so a crack calibration curve was created. According to the variations of eddy current signal amplitude,an exponential relational expression between eddy current signal amplitude and the depth of crack was established:

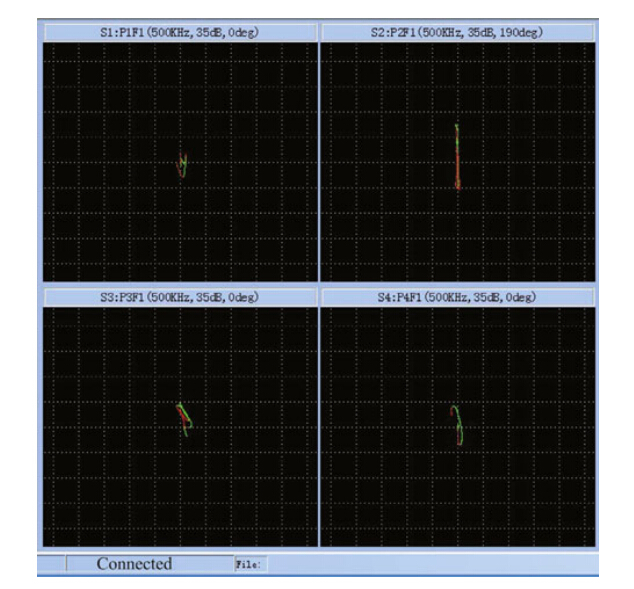
Due to adopted multi-frequency eddy current probe,a four-impedance measurement mode was determined. S1- S4 measuring windows respectively coincided with the first to the fourth physical measuring channels,the first channel and the second channel on the leftRangle zone of crank, the third channel and the fourth channel on the right Rangle zone of crank.
A crank including pit corrosion was measured by the eddy current probe turning around the tested rod journal uniformly to pick the damage information on the R angle zone. The amplitude of S2 measuring window was apparently higher than that of S1,S3 and S4 measuring window on the pit position (see Fig. 7). The calibrated pit depth was 0.85 mm.
 |
| Fig. 7 Abnormal signals of measured crank by multi-frequency eddy current testing |
Based on the results of standardized parts and crank component fatigue tests,an early damage identification and residual fatigue strength model of crankshaftRangle zone was established,and an assessment equipment was developed by means of metal magnetic memory/multi-frequency eddy current signals,which can automatically diagnose the damage degree of crankshaft R angle zone and give assessment result for remanufacturing ability. The assessment equipment included four modules including guide stay structure,motion control components,signal collection components and damage evaluation system. 4 Conclusions
The remaining life prediction of remanufacturing core is always a difficult problem in remanufacturing field. Our remanufacturing laboratory explored the feasibility of remaining life prediction on crankshaft cores by electromagnetic nondestructive testing. However,only some research findings on semi-quantitative damage evaluation were achieved. In the future ultrasonic damage information, light damage information and thermal damage information will be supplied into the remaining life researches,then the quantification level of remaining life on remanufacturing cores will continue to develop.
| 1. | Feng JJ, Guo WF (2006) Main failure forms and analysis of automobile engine crankshaft. Fail Anal Prev 1:7–10 |
| 2. | Zhou X (2006) Theoretical and experimental study on fatigue behavior and reliability of engine crankshaft. Dissertation, Zhejiang University, Hangzhou |
| 3. | Liu RC, Ma SY, Ma GQ (2010) Theory and numerical modeling of key parameters design on crankshaft rolling. National Defense Industry Press, Beijing |
| 4. | Xu BS, Liu SC (2005) Study on the contribution of engine remanufacturing to the recycle economy. China Surf Eng 1:1–7 5. Xu BS, Liu SC, Shi PJ (2006) An analysis of contribution to economy in circle of remanufacturing engineering and surface engineering. China Surf Eng 19(1):1–6 |
| 6. | Liang XB, Chen YX, Bai JY et al (2010) Remanufacturing crankshaft by automatic high speed electric arc spraying. China Surf Eng 23(2):112–116 |
| 7. | Dong LH, Xu BH, Dong SY, Wang D (2010) A preliminary investigation of remaining life prediction on crankshaft core by metal magnetic memory testing. China Surf Eng 23(2):106–111 |
| 8. | Wang ZZ, Cheng ST, Cheng SY et al (2008) Differentiation and analysis on reliability of diesel engine crankshaft. Diesel Engine 30(5):32–47 |
| 9. | Wang GX, Sun WF, Li XB et al (2010) Dynamic stress analysis of a certain single-cylinder diesel engine crankshaft. In: 29th Chinese control conference, Beijing, China, 29–31 July 2010 |
| 10. | Doubov AA (1997) A study of metal properties using the method of magnetic memory. Metal Sci Heat Treat 39(9/10):401–402 |
| 11. | Li LM, Huang SL, Wang XF (2003) Magnetic field abnormality caused by welding residual stress. J Magn Magn Mater 26(1): 385–391 |
| 12. | Dong LH, Xu BS, Dong SY et al (2005) Metal magnetic memory testing for early damage assessment in ferromagnetic materials. J Central South Univ Technol 12(S2):102–106 |
| 13. | Dong LH, Xu BS, Dong SY et al (2008) Monitoring fatigue crack propagation of ferromagnetic materials with spontaneous abnormal magnetic signals. Int J Fatigue 30(9):1599–1605 |
| 14. | Ren JL, Lin JM (2008) Electromagnetic nondestructive testing. Science Press, Beijing |
| 15. | Wang FS, Zhang HJ, Zhu WH et al (2010) Study of damage prediction model on subsurface engineering structure. In: 2010 International conference on computing, control and industrial engineering, Nanjing, China, 5–6 June 2010 |
 2013, Vol. 1


