The article information
- Buffa G., De Lisi M., Sciortino E., Fratini L.
- Dissimilar titanium/aluminum friction stir welding lap joints by experiments and numerical simulation
- Advances in Manufacturing, 2016, 4(4): 287-295.
- http://dx.doi.org/10.1007/s40436-016-0157-2
-
Article history
- Received: 28 June, 2016
- Accepted: 11 October, 2016
- Published online: 1 December, 2016
Recently, the demand for lightweight components is increasing because of the need by aerospace, automotive and ground transportation industries for fuel consumption reduction. Titanium alloys are characterized by excellent physical and mechanical characteristics such as the high strength, low density, corrosion resistance and biocom-patibility [1]. For this reason, titanium alloys can be found in different engineering applications in the chemical, marine, aerospace and biomedical fields [2]. One of the most used titanium alloys, accounting for more than half of all titanium tonnage in the world, is Ti6Al4V belonging to alpha-beta alloys (aluminum stabilizes the alpha phase, and vanadium stabilizes beta phase). On the other hand, aluminum alloys are extensively being used due to their low weight, low cost and high corrosion resistance. Key applications can be found in aerospace industry, but they are common in automobile building and packaging industry as well. The aluminum alloy AA2024 has copper and magnesium as main alloying elements that improve mechanical resistance. Due to its proprieties, this alloy is especially used in wing and fuselage structures.
In the last years, increasing demand for hybrid structures, able to combine the advantages provided by the two alloys, is observed. Unfortunately, the use of traditional fusion welding processes presents several drawbacks and difficulties because of the two materials’ different melting points, heat conductivity and coefficients of linear expansion. Additionally, problems can arise from the intermetallic components that form between the alloys. In fact, Ti3Al, TiAl, TiAl2 Ti2Al5 and TiAl3, can be easily formed during the welding. In particular, TiAl3 is the commonest due to its lower Gibbs free energy of formation because it is the only one which can be formed at a temperature lower than the aluminum melting temperature [3, 4]. Wei et al. [5] and Dressler et al. [6] showed how fracture during tensile shear tests occurred at Al/Ti interface. Wilden and Bergmann [7], and Yao et al. [8] studied the diffusion bonding process in order to produce dissimilar titanium/aluminum joints [7, 8]. Good results could be obtained using laser arc hybrid welding [9]: Cross welding strength up to 95.5% of the same Al weld was obtained joining AA6061 and Ti6Al4V. However, laser processing is still expensive due to the high cost of the equipment. Finally, intermetallics can be created during the process resulting in embrittlement of the joint in most cases. Elrefaey and Tillmann [10] studied the solid state diffusion bonding of titanium to steel using a copper base alloy as interlayer finding intermetallic layers as CuTi, Ti2Cu and TiC2 making the weld too brittle.
Friction stir welding (FSW) is a solid-state joining process in which melting temperature is not reached, avoiding the formation of oxides, brittle cast structures, metallurgy porosity and cracking, “hot cracking”, large distortion and residual stresses. Because of this, FSW is preferable over traditional fusion welding processes to join aluminum and titanium alloys. After its invention, FSW was applied to weld several materials and alloys, e.g., aluminum alloys, magnesium alloys, titanium alloys, nickel-copper super-alloys, in the aerospace, shipbuilding and automotive fields. Researchers and industries have shown interest in studying the process in order to avoid possible defects caused by inappropriate heat input or incorrect plunging settings [11, 12]. Different kinds of geometric set-up were explored changing process parameters such as feed speed, tool rotation rate, tilt angle, plunging depth, and relative position between tool and materials. The results of various configurations have been scanned. The relevance of tool geometry was investigated and it was found that it was crucial for the correct material flow and increasing tensile strength [12].
FSW of dissimilar joints has been studied and demonstrated feasible with the aim to put right materials in right places, giving more resistance where it is needed, and reducing weight where it is possible. Many studies focused on FSW between different lightweight alloys as magnesium and aluminum ones, analyzing different material arrangements and the effects of varying welding parameters on hardness distribution, tensile resistance and joint microstructure [13, 14]. Only a very limited number of papers are found on the FSW of dissimilar aluminum to titanium joints. Li et al. [15] studied the influence of process variables on the weld interfaces and tensile properties of Ti6Al4V alloy to Al6Mg alloy. It was found that higher joint mechanical tensile strength could be reached when the Ti-Al diffusion bonding interlayer was obtained. Wu et al. [16] examined the influence of welding parameters on the interface and the properties of a Ti6Al4V alloy to AA6061 alloy joint investigating the macrostructure of the joint, the fracture surfaces and the reaction layer. Continuous TiAl3 intermetallic compounds at the interface of the two materials were found with the welding parameters used. The interface thickness, key factor for obtaining good tensile strength and appropriate fracture locations, was associated to the rotating rate. The joints bonded at the rotating rate of 750 r/min failed in the TMAZ/ HAZ and had the highest tensile strength, accompanied with the perfect bonded and thin interface. Finally, recently Zhang et al. [17] studied the effect of pin offset in butt joints made out of TiC4 titanium alloy and 5A06 aluminum alloy. As far as lap joints were concerned, Chen and Nakata [18] welded pure titanium to ADC12 cast aluminum alloy sheet. TiAl3 intermetallic was found when improper heat was input to the joint. However, the feasibility of the process was demonstrated and the maximum failure load equal to 62% of the aluminum alloy was reached. Chen et al. [19] produced lap joints out ofTC 1Ti alloy and LF6 Al alloy finding decreasing failure load with increasing welding speed. Chen and Yaz-danian [20] studied the influence of the pin penetration in dissimilar lapjoints made of AA6060 and Ti6Al4V when the aluminum sheet was positioned at the top of thejoint. Finally, Wei et al. [5] obtained lap joints by welding aluminum 1060 and titanium alloy Ti6Al4V using a cutting pin approach, according to which the bottom surface of the pin cut off the top surface layer of the titanium sheet, i.e., the bottom sheet.
Although significant knowledge has been gained in the last years on dissimilar FSW, the complex material flow occurring due to the two different materials is still unclear. A properly designed numerical model of the process can help in the understanding of the occurring process mechanics enabling the use of these joints for industrial applications. In the last years, different research groups have been working on the development of a dedicated numerical model for FSW. Thermo-mechanically coupled finite element method (FEM) models have been developed [21, 22]. Good agreement and fine matching have been achieved between numerical and experimental results in terms of predicting the effect of process parameters on process thermo-mechanics and temperature distribution. Similar and dissimilar joints have been analyzed with FEM, in order to understand material flow, strain, strain rate and temperature distributions, verified by experimental validation [23, 24]. However, finite element analysis (FEA) of FSW is still not mature enough in terms of analyzing and predicting material flow, temperature distribution and effects of geometrical and material arrangements of dissimilar butt and lap joints of the most used alloys such as aluminum, magnesium and titanium ones. As far as the authors know, there are no papers focusing on the FEM models of FSW between Ti6Al4V and an aluminum high-resistant alloy highlighting the occurring material flow.
In this paper, an experimental campaign, aimed at the production of dissimilar Ti6Al4V and AA2024 lap joints, was carried out. Several process conditions were tested by varying tool rotation and feed rate. A dedicated numerical model, able to take into account the presence of the two different materials, was used to simulate the process and help explain the experimental observations.
2 ExperimentalDissimilar lap joints were obtained joining a Ti6Al4V titanium alloy sheet, 80 mm × 90 mm, 1.6 mm in thickness, and an AA2024-T4 aluminum alloy sheet, 80 mm × 90 mm, 1.2 mm in thickness. The significant difference in the mechanical and thermal properties between the two materials is the cause of the difficulties arising when traditional fusion welding techniques are used to create hybrid joints with these materials. In turn, FSW is able to overcome such different materials’ behavior once proper process parameters are selected. As far as the process parameters are regarded, three different values of tool rotation and feed rate are considered. Tilt angle and tool plunging are kept constant for all the tests (see Table 1).
Argon shielding was used in order to prevent oxidization. For all experiments, the plunge speed was kept constant to 0.001 25 mm/r. It is worth noticing that the last parameter is extremely important in FSW of titanium alloys, as the tool life is regarded. In fact, during the plunge phase and the very beginning of the welding, a significant mechanical stress was applied on the tool as the sheets to be welded were still "cold". Every weld was repeated three times and, from each obtained lap joint, specimens, 12 mm in width, were cut by waterjet for shear load tests. The tests were executed using a constant velocity of 0.5 mm/min and proper tabs were used to avoid excessive bending secondary effects.
When FSW is applied to high resistant alloys, as titanium alloys, the choice of the tool material is critical. The author demonstrated the effectiveness of W25Re tungsten alloy against more common tungsten carbide alloys as K10 and K10-K30 [25]. The tool was characterized by a 13 mm shoulder, a conical pin with major diameter of 4.5 mm, semi-cone angle of 30°, and pin height of 2.4 mm. The titanium sheet was used as top sheet. It is worth noticing that in this configuration, being the softer material at the bottom of the joint, there is no limit to the pin penetration due to the excess of wear in the pin, as it occurs when the softer material is placed on the top and the "cold" pin tip contacts the harder material [20]. The advancing side was placed on the side of the titanium sheet free edge of the joint. Previous studies demonstrated that this configuration maximized the mechanical resistance of the joints [24]. A sketch of the process configuration is shown together with the tool geometry (see Fig. 1).
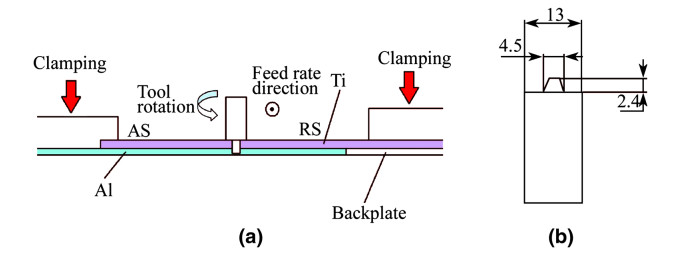
|
| Fig. 1 a Sketch of the process configuration selected and b tool geometry |
Finally, from each weld, further specimens were derived, embedded by hot compression mounting, polished, etched and observed by a light microscope. The specimens were etched with Keller reagent for 30 s. Microhardness tests were performed on the embedded specimens along two lines at half thickness of each sheet.
3 Numerical modelA Lagrangian, thermo-mechanically coupled 3D FEM model with a rigid visco-plastic material behavior was developed. The analysis was conducted using the 3D version of the implicit Lagrangian code DEFORM™. Temperature, strain, and strain rate material flow were considered for the two materials. AA2024 material data were taken from the material library of the software; Ti6Al4V material data were taken from previous studies [24, 26]. Figure 2 shows the utilized curves, as a function of temperature. It is worth noticing that material flow stress is input in the model in the form of tabular data.

|
| Fig. 2 Flow curves as a function of temperature for a AA2024 and b Ti6Al4V |
For the heat exchange between the two sheets, the coefficient used was 1.9 N/(s·mm·℃). Heat transfer with the environment at room temperature of 20 ℃ was enabled. The heat exchange coefficient used was 0.02 N/(s·mm·℃).
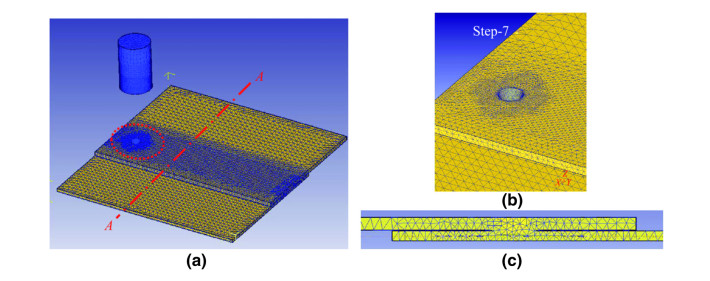
A single block model was utilized, i.e., the two sheets were modeled as a unique simulation object, for whichjust the zone corresponding to the pin position during welding presented material continuity. This choice was made in order to avoid numerical instabilities and, at the same time, take into account the thermal barrier at the sheet-sheet interface. Figure 3 shows the model at the beginning of the simulation highlighting the cross section and the mesh utilized.
|
| Fig. 3 a Numerical model at the beginning of the simulation, b finer mesh moving window around the tool and c cross section AA of the joint |
The tool and workpiece were meshed with tetrahedral elements. The workpiece model consisted of about 60 000 elements, with finer mesh window along the weld line. Additionally, a further refining circular window, moving with the tool, was used to obtain accurate prediction of material flow and material volume fraction. The tool was modelled as a rigid object (in tungsten carbide) and meshed with about 10 000 elements for the thermal analysis only.
In order to model a dissimilar friction stir welded joint, a fictitious phase transformation had to be set. In fact, the workpiece was formed by a single material object in both simulations. The material model of the workpiece was set as a bi-phasic material in which the two phases were Ti6Al4V and AA2024. The single-block workpiece was made of one of the two phases, i.e., AA2024. Then a fictitious transformation was induced in such a way that the part corresponding to the titanium sheet changed its phase into titanium one. After it was completed, this transformation was disabled, obtaining a starting workpiece composed of the two alloys considered. A similar approach was used by Buffa to simulate dissimilar FSW of Ti6Al4V and AISI 304 [24]. Further details on the numerical approach used for the phase change can be found in the above mentioned paper. Furthermore, pressurized argon impinging jet shielding has been implemented with a toroidal environment window.
Regarding inter-objects relations, the shear model, according to which the shear stress was equal to a certain percentage of the material shear flow stress, was utilized. In particular, a constant factor of 0.45 was used to model the contact between the tool and the aluminum alloy sheet, whereas a constant factor of 0.35 was applied at the contact between the titanium alloy and the tool. These values are taken from previous studies of the authors on similar welds for the considered materials [21, 27]. A constant interface heat exchange coefficient of 11 N/(s·mm·℃) was used for the parts of the workpiece that were in contact with the tool. As the CPU time was considered, only a few minutes were needed in order to simulate the phase change while the welding process, including the tool plunge and the tool movement along the weld seam, took about 20 h. The different material flows and main field variable distributions were used to highlight the changes in the process mechanics due to the offset.
4 Results and discussionsFirst, a preliminary campaign was carried out with the aim to identify a proper process window. Figure 4 shows the top view of the weld seams obtained under the above described three different process conditions. When too much heat is conferred to the joint titanium oxidation and aluminum melting may occur, resulting in detrimental effects for the joint integrity (see Fig. 4c). In turn, when the heat input is too low, insufficient material flow is generated and macro defects can be observed on the top surface of the joint along the weld seam (see Fig. 4a).

|
| Fig. 4 Top view of the weld seam for a too low heat input, b correct heat input and c too high heat input |
Once the process window resulting in sound weld seams, at least from joint observation, was identified (see Table 1), shear tests were carried out. Proper tabs were used in order to prevent excess of bending. In Fig. 5, the results obtained with varying process parameters are reported in terms of ratio between the maximum failure load and the specimen width, i.e., the weld length considered (12 mm).

|
| Fig. 5 Maximum shear force per weld length as a function of tool rotation and feed rate |
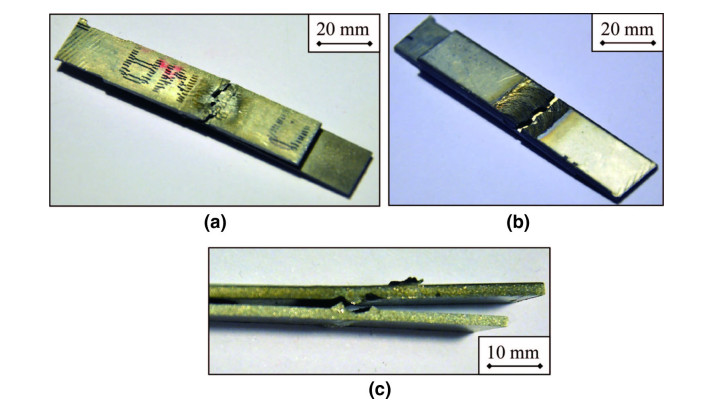
Analyzing the results, it can be observed that increasing strength is found with increasing feed rate and fixed tool rotation. On the other hand, when constant feed rate is considered, the maximum failure load is obtained for the lower tool rotation value considered, i.e., 900 r/min, while a minimum is found for the central value of tool rotation, i.e., 1 200 r/min. In this way, the maximum failure load was 200 N/mm for the specimen characterized by tool rotation of 900 r/min and feed rate 200 mm/min, corresponding to the "coldest" weld among the case studies taken into account. In order to explain this behavior, further analyses are needed. In particular, the fracture location of the specimens was observed and recorded. For the nine different case studies here considered, three fracture modes were observed. In detail, for the joints characterized by the highest shear strength, fracture occurred in the advancing side of the aluminum sheet (see Fig. 6a). On the other hand, for the joints obtained with the largest value of tool rotation fracture occurred in the retreating side of the titanium sheet (see Fig. 6b). This anomalous behavior, as fracture occurs at the advancing side for sound FSW, is due to the excess of heat resulting in oxides formation which embrittles the top sheet. Finally, for the joints characterized by the lowest values of shear strength, sheet separation is observed (see Fig. 6c). For these joints, a peculiar shape of the fractured welded interface is found, characterized by a titanium protrusion in the center of the nugget zone and two aluminum raised edges. The reasons for this fracture morphology will be discussed in the following.
|
| Fig. 6 Fracture morphologies after shear tests: a aluminum sheet, advancing side; b titanium sheet, retreating side; c interface between the sheets |
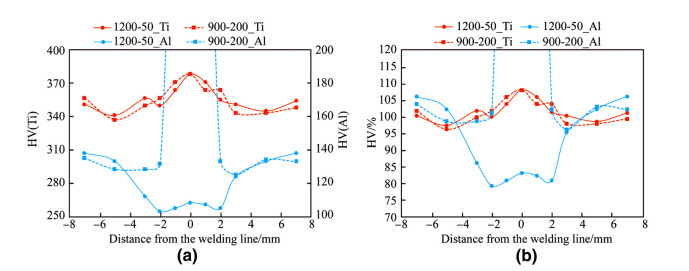
Vickers microhardness was measured in the transverse section of the joints. Two measurement lines were considered, with measurement point distance equal to 1 mm, at mid thickness of each of the two sheets. Figure 7 shows the results obtained for the two welds produced with R=1 200 r/min and f=50 mm/min and R=900 r/min and f=200 mm/min, respectively. In particular, in Fig. 7a HV values are reported while in Fig. 7b the HV efficiency, i.e., the ratio between the HV value measured and the HV of the base material, is shown. It is worth noticing that these welds correspond to the process conditions resulting in the maximum and minimum shear strengths, respectively, among the considered parameters.
|
| Fig. 7 a HV profiles and b HV efficiency obtained for R=1 200 r/min and f=50 mm/min and R=900 r/min and f=200 mm/min case studies |
An interesting HV trend is observed for the two welds. As the titanium sheet is taken into account, a typical HV curve is found, characterized by HV values higher with respect to the base material in the stirred area. This is due to the microstructural modifications induced by the continuous dynamic recrystallization (CDRX) phenomenon [26]. In turn, as the aluminum sheet is considered, a completely different behavior is obtained. For the weld produced with R=900 r/min and f=200 mm/min, HV equal to about 130, corresponding to the HV value of the parent material, is found outside the stirred area. In the stirring area, titanium is found at mid height of the aluminum sheet, and the value of HV increases up to 360-370, with similar values to the ones observed in the same area in the titanium sheet. It is worth noticing that these values (not visible as a different scale was chosen for the aluminum sheet in order to better visualize the HV trend for the hotter weld) are due to the presence of titanium, as it will be better illustrated in the following. Although the presence of intermetallic phases is likely to occur at the boundary between aluminum and titanium, which has not been analyzed in this study. A decrease in the HV is observed in the stirred area for the weld obtained with R=1 200 r/min and f=50 mm/min. In particular, minimum value of about 103 (HV) is measured in the advancing side of the joint.
Macro observations of the cross section of the joints allowed explaining the HV profiles obtained and identifying flow defects and lack of continuity. In Fig. 8, the etched cross sections obtained from the same welds considered in the previous figure are shown.

|
| Fig. 8 Cross section of the a R=1 200 r/min and f=50 mm/min, and b R=900 r/min and f=200 mm/min case studies |
Common characteristics of the two cross sections are the presence of titanium alloy in the weld nugget corresponding to the tool pin area, and an upward material flow occurring in the aluminum sheet at the edges of the nugget zone. However, significant differences exist between the two welds. In particular, large void areas are found in the nugget zone of the specimen obtained with R=1 200 r/min and f=50 mm/min. In particular, material continuity is not obtained along the pin tip area but only at its edges, where the upward material flow of the aluminum sheet can be observed. Hence, it can be stated that fracture mode shown in Fig. 6c is due to the detachment of the aluminum back extruded edges from the titanium sheet. Similar voids, although smaller, have also been observed for the weld characterized by R=1 200 r/min and f=100 mm/min, while material continuity was found for the weld produced with R=1 200 r/min and f=200 mm/min. Additionally, compared to the joint welded using R=900 r/min and f=200 mm/min, separation between the aluminum and titanium sheet can be also observed away from the welding zone. This is due to the higher heat input resulting from the combination of high tool rotation and low feed rate, which enhances joint distortion. Although the presence of voids can explain the poor performance in the shear tests, the reasons for this behavior must be searched in the occurring material flow, which can be studied in detail by numerical simulation. In particular, the different penetrations of the top titanium material into the bottom aluminum sheet can be evaluated as a function of the process input parameters.
Temperature profiles in the cross section of the joints, behind the tool pin, i.e., when the material has just closed behind the pin itself, are shown in Fig. 9 for the welds obtained. The former is the weld characterized by the highest heat input among the ones analyzed in this study.

|
| Fig. 9 Temperature profiles in the cross section of the welds produced with a R=1 500 r/min and f=50 mm/min, and b R=900 r/min and f=50 mm/min |
Large temperature values are observed for the hottest weld. The maximum temperature of about 1 000 ℃ is obtained close to the top surface of the joint. Additionally, temperature in excess of the melting temperature of aluminum is found in the bottom sheet. It should be observed that in the weld nugget titanium is also found in the bottom sheet behind the tool. Significantly lower temperature is calculated for the weld produced with R=900 r/min, for which the aluminum sheet temperature close to the nugget is below the melting temperature. It is worth noticing that, although for a given tool rotation temperature increases with feed rate, the increase is limited and less significance with respect to the one due to the increase of tool rotation [26].
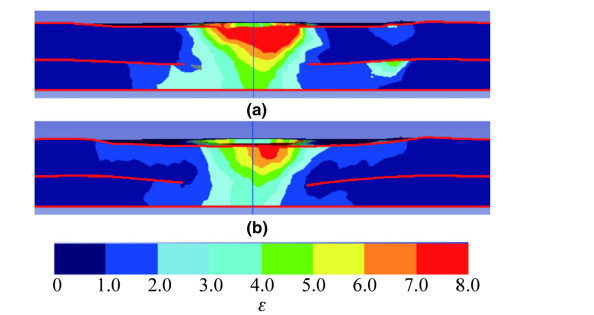
An analogous trend is found for the effective strain. Figure 10 shows the strain profiles obtained for the same welds in the same position. It is seen that, although only a small increase is found for the maximum value with increasing tool rotation, the area interested by large effective strain is larger and reaches the bottom sheet. This condition, consistent with the ones obtained by Buffa in Ref. [24], is usually beneficial for the joint effectiveness as enhanced solid bonding and material mixing.
|
| Fig. 10 Effective strain profiles in the cross section of the welds produced with a R=1 500 r/min and f=50 mm/min, and b R=900 r/min and f=50 mm/min |
Finally, the simulated material flow was analyzed. Figure 11 shows the evolution in time of the titanium volume fraction during the welding process in a given cross section. When the tool pin section is considered (see Fig. 11a), aluminum is pushed downwards and a “v” shape is observed because of the material separation at the bottom edges of the pin itself (black arrows). After the material rotating with the tool is close behind the pin, an upwards material flow is generated at the sides of the nugget area while titanium remains in the center of the weld in the bottom sheet (see Fig. 11b). After 1 s further upwards material flow creates the final shape of the cross section as experimentally observed in Fig. 8b.

|
| Fig. 11 Titanium volume fraction evolution during the welding process: a tool pin section, t=0 s; b t=0.2 s; c t=1 s (R=900 r/min, f=200 mm/min) |
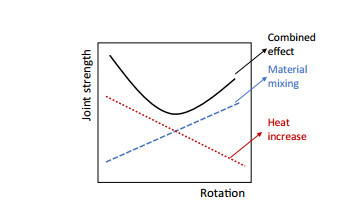
The interpretation of the experimental and numerical results previously shown is schematically summarized in Fig. 12, which can explain the results obtained during the shear tests. With increasing tool rotation, larger heat is input into the joint. This phenomenon has a detrimental effect on the joint effectiveness, especially if the aluminum sheet, for which melting temperature can be reached for the extreme process conditions, is considered. On the other hand, the increased area affected by large deformation enhances solid bonding with beneficial overcome on the joint strength. The simultaneous effects of these phenomenon result in the minimum observed in Fig. 5.
|
| Fig. 12 Schematic representation of the combined effects of heat increase and material mixing on the joint strength |
An experimental and numerical campaign has been carried out with the aim to study the behavior of dissimilar Ti6Al4V-AA2024 lap joints produced by FSW. From the obtained results the following main conclusions can be drawn:
(ⅰ) For a given feed rate, the maximum shear failure load has a minimum in correspondence of the central value of tool rotation. Less significant variations are found when given tool rotation is considered. In these conditions strength increases with feed rate.
(ⅱ) A combined effect is found on the joint strength. With increasing tool rotation, the heat input to the joint increases, resulting in detrimental effects, especially on the aluminum sheet. On the other hand, the deformed area increases with tool rotation, resulting in beneficial effects on the solid bonding of the two materials. Hence, a minimum is found in the joint strength as a function of tool rotation.
(ⅲ) Feed rate has a lower impact on the joint temperature and strength with respect to tool rotation.
(ⅳ) An upward material flow is observed at the sides of the stir zone in the aluminum sheet. In turn, a downward material flow is generated at the center of the stir zone in the titanium sheet. The combination of these material flows results in a peculiar “waived” profile observed in the macrographs and predicted by the model.
| 1. | Leyens C, Kocian F, Hausmann J, et al(2003) Materials and design concepts for high performance compressor components. Aerosp Sci Technol, 7(3), 201-210 doi:10.1016/S1270-9638(02)00013-5 |
| 2. | Elias KL, Daehn GS, Brantley WA, et al(2007) An initial study of diffusion bonds between superplastic Ti-6Al-4V for implant dentistry applications. J Prosthet Dent, 97(6), 357-365 doi:10.1016/S0022-3913(07)60024-9 |
| 3. | Sujata M, Bhargava S, Sangal S(1997) On the formation of TiAl3 during reaction between solid Ti and liquid Al. J Mater Sci Lett, 16(13), 1175-1178 doi:10.1023/A:1018509026596 |
| 4. | Wang GX, Dahms M, Leitner G et al (1994) Titanium aluminides from cold-extruded elemental powders with Al-contents of 25-75 at% Al. J Mater Sci 29(7):1847-1853 |
| 5. | Wei Y, Li J, Xiong J, et al(2012) Joining aluminum to titanium alloy by friction stir lap welding with cutting pin. Mater Charact, 71, 1-5 doi:10.1016/j.matchar.2012.05.013 |
| 6. | Dressler U, Biallas G, Alfaro MU(2009) Friction stir welding of titanium alloy TiAl6V4 to aluminium alloy AA2024-T3. Mater Sci Eng A, 526(1-2), 113-117 doi:10.1016/j.msea.2009.07.006 |
| 7. | Wilden J, Bergmann JP(2004) Manufacturing of titanium/aluminium and titanium/steel joints by means of diffusion welding. Weld Cut, 3(5), 285-290 |
| 8. | Yao W, Wu A, Zou G, et al(2007) Structure and forming process of the Ti/Al diffusion bonding joints. Xiyou Jinshu Cailiao Yu Gongcheng/Rare Met Mater Eng, 36(4), 700-704 |
| 9. | Gao M, Chen C, Gu Y, et al(2014) Microstructure and tensile behavior of laser arc hybrid welded dissimilar Al and Ti alloys. Materials, 7(3), 1590-1602 doi:10.3390/ma7031590 |
| 10. | Elrefaey A, Tillmann W(2009) Solid state diffusion bonding of titanium to steel using a copper base alloy as interlayer. J Mater Process Technol, 209(5), 2746-2752 doi:10.1016/j.jmatprotec.2008.06.014 |
| 11. | Kim YG, Fujii H, Tsumura T, et al(2006) Three defect types in friction stir welding of aluminum die casting alloy. Mater Sci Eng A, 415(1-2), 250-254 doi:10.1016/j.msea.2005.09.072 |
| 12. | Nandan R, DebRoy T, Bhadeshia HKDH(2008) Recent advances in friction-stir welding:process, weldment structure and properties. Prog Mater Sci, 53(6), 980-1023 doi:10.1016/j.pmatsci.2008.05.001 |
| 13. | Khodir SA, Shibayanagi T(2008) Friction stir welding of dissimilar AA2024 and AA7075 aluminum alloys. Mater Sci Eng B:Solid-State Mater Adv Technol, 148(1-3), 82-87 doi:10.1016/j.mseb.2007.09.024 |
| 14. | Liu D, Xin R, Zheng X, et al(2013) Microstructure and mechanical properties of friction stir welded dissimilar Mg alloys of ZK60-AZ31. Mater Sci Eng A, 561, 419-426 doi:10.1016/j.msea.2012.10.052 |
| 15. | Li B, Zhang Z, Shen Y, et al(2014) Dissimilar friction stir welding of Ti-6Al-4V alloy and aluminum alloy employing a modified butt joint configuration:influences of process variables on the weld interfaces and tensile properties. Mater Des, 53, 838-848 doi:10.1016/j.matdes.2013.07.019 |
| 16. | Wu A, Song Z, Nakata K et al (2015) Interface and properties of the friction stir welded joints of titanium alloy Ti6Al4V with aluminum alloy 6061. Mater Des 71:85-92 |
| 17. | Zhang Z, Shen Y, Feng X, et al(2016) Dissimilar fiction stir welding of titanium alloy and aluminum alloy employing a modified butt joint configuration. Hanjie Xuebao/Trans China Weld Inst, 37(5), 28-32 |
| 18. | Chen YC, Nakata K(2009) Microstructural characterization and mechanical properties in friction stir welding of aluminum and titanium dissimilar alloys. Mater Des, 30(3), 469-474 doi:10.1016/j.matdes.2008.06.008 |
| 19. | Chen YH, Ni Q, Ke LM(2012) Interface characteristic of friction stir welding lap joints of Ti/Al dissimilar alloys. Trans Nonferrous Met Soc China (Engl Ed), 22(2), 299-304 doi:10.1016/S1003-6326(11)61174-6 |
| 20. | Chen ZW, Yazdanian S(2015) Microstructures in interface region and mechanical behaviours of friction stir lap Al6060 to Ti-6Al-4V welds. Mater Sci Eng A, 634, 37-45 doi:10.1016/j.msea.2015.03.017 |
| 21. | Buffa G, Hua J, Shivpuri R, et al(2006) A continuum based FEM model for friction stir welding:model development. Mat Sci Eng A:Struct, 419(1-2), 389-396 doi:10.1016/j.msea.2005.09.040 |
| 22. | Gök K, Aydin M(2013) Investigations of friction stir welding process using finite element method. Int J Adv Manuf Technol, 68(1-4), 775-780 doi:10.1007/s00170-013-4798-z |
| 23. | Abbasi M, Bagheri B, Keivani R(2015) Thermal analysis of friction stir welding process and investigation into affective parameters using simulation. J Mech Sci Technol, 29(2), 861-866 doi:10.1007/s12206-015-0149-3 |
| 24. | Buffa G(2016) Joining Ti6Al4V and AISI 304 through friction stir welding of lap joints:experimental and numerical analysis. Int J Mater Form, 9(1), 59-70 doi:10.1007/s12289-014-1206-7 |
| 25. | Buffa G, Fratini L, Micari F, et al(2012) On the choice of tool material in friction stir welding of titanium alloys. In:Transactions of the North American Manufacturing Research Institution of SME, pp785-794 |
| 26. | Buffa G, Ducato A, Fratini L(2013) FEM based prediction of phase transformations during friction stir welding of Ti6Al4V titanium alloy. Mater Sci Eng A, 581, 56-65 doi:10.1016/j.msea.2013.06.009 |
| 27. | Buffa G, Ducato A, Fratini L(2013) Dissimilar material lap joints by friction stir welding of steel and titanium sheets:process modeling. In:AIP Conference Proceedings, pp491-498 |
 2016, Vol. 4


